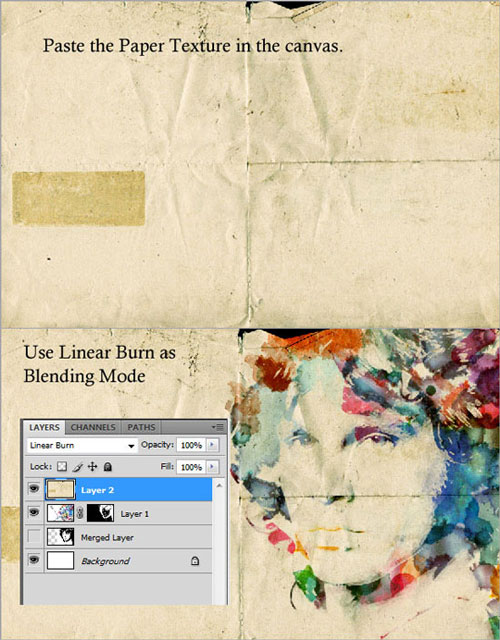
This is my first topic here in Tutorials section.
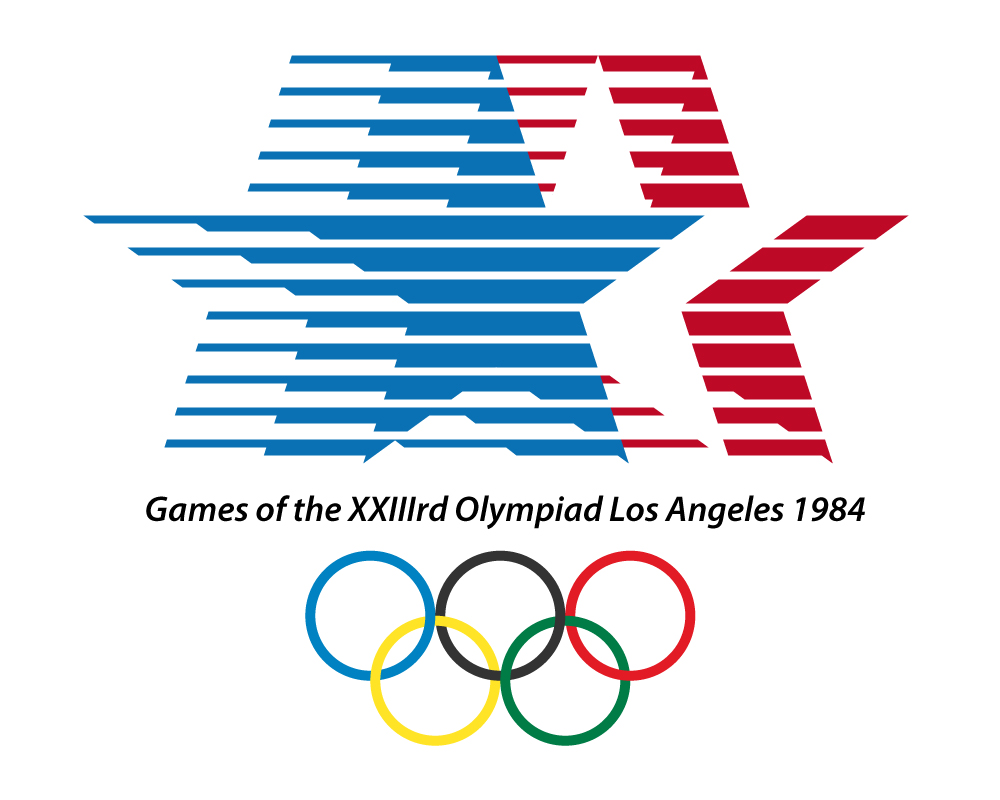
In this new Olmpic logo design series, we will discuss how to create the best and most challenging emblems of Olympic Games. We’ll recreate the next Olympic logo – the emblem of Olympic Games in Los Angeles in 1984. The logo is pretty made up of stylized lines and we shall see how to achieve this line effect in illustrator. The idea is rather simple, but at the same time technically it is not easy to create – and it makes this logo very professional and memorizing piece of design. We’ll try to repeat all elements, so that the final result matches the original.
Getting Started1. Open Adobe Illustrator (I always use CS3 version, but you can use any other) and create a document 1000 x 800 px, RGB mode. Turn on Smart guides (Command + U) – they will be very helpful today. Now you can turn on Grid (Command + ‘) like I did – in this case adjust it’s size to 40 px with 10 subdivisions in Edit > Preferences > Guides & Grid. Now let’s start creating major objects. We’ll begin with constructing the main shapes and composition, and then we’ll dress them in custom patterns. The main element is star, so let’s make it.
Grab a Star Tool and drag a star holding down Shift to put it on the baseline, and Alt to make it proportional – this is important, as this is the exact shape we need. Leave it’s appearance basic – white fill and black stroke. Now, here is another important step – resizing the star precisely. Open Transform panel (Shift + F8) and, with star selected, press a small chain on the right. Now in height field (H) enter 408 px, and the size will be changed proportional – this is the exact height we need.
2. Now Alt-drag the star to the side to make a copy. We’ll get back to the copy later, it will be the backup. Select the original star, grap the Pen Tool (P) and delete the bottom-left endpoint of it – the pen should get minus sign, turning to Delete Points Tool (or you can take this tool from the start). The star will be 4-ended now, without one end. Change it’s fill color to red and stroke to none, and again, Alt-drag it to the right to make a copy – you’ll have one white backup star and two red 4-ended stars.

3. Select one of the 4-ended red stars, change it’s fill to lighter red shade so that you don’t get confused between them. Now, again we need to duplicate it in order to make a larger shape. This time we’ll need a precise positioning, so select the lighter red shape, press Enter with Selection Tool (V) chosen, and insert 100 px for horizontal move, and 0 px for vertical move, now click Copy. The new shape must appear on the right, exactly 100 px from original. We’ll combine them in next step.
4. We need to unite these two shapes, zoom in and make sure the Smart Guides are turned on (Command + U). Our purpose is to join 2 stars in top and bottom points, so we’ll create additional shapes to cover gaps between star ends and then unite. Take a Pen Tool (P) and put first point exactly on top point of one shape (smart guides will indicate “anchor” intersection), then put second one on the second top point, then put third and fourth points in the middle of stars and close the shape. Now do the same with bottom points, creating a shape with Pen tool joining them exactly. Now you’ll have 4 shapes – select them, open Pathfinder panel (Shift + Command + F9) and Alt-click Add button to unite and expand. (I changed the color of shapes to gray in the screenshot, so that you see them).

5. Now, when you have this strange united shape, select it and while choosing Selection Tool (V) click Enter. Here, insert 100 px for horizontal move and 0 px for vertical move, click Copy. We’ll get another shape on the right position. Now change the fill of left one to even lighter red. We change the fill color only to distinct the shapes, we’ll later change it. Finally, take the first 4-ended dark red star and move it to our 2 shapes, you’ll also need to bring it to front (Command + Shift + ]). Aligning the right and top points (with help of smart guides) to get image similar to this.

6. Go back to the star we made in the first step – the white one. Bring it to front (Command + Shift + ]) and Alt-drag it to the red set of shapes in order to make another copy. Align it with the middle red star. We just created the first set of stars that will later be a right part of logo – the red and white shapes. I suggest that you lock all three red shapes and one white star in the Layers panel (or select them and press Command + 2). We’ll work with the remained white star copy – change it’s fill color to blue and stroke to none. Note that I always copy stars in order not to create them again from scratch, but if you forgot to backup the star – simply create it again referring to Step 1.

7. Now. we need to do the same operations with blue star that we made with red one – duplicate it, unite, make copies and align. So, we already have the first blue star, to make the first united shape we need to duplicate it and work with copy, so Alt-drag it somewhere to the side, while keeping the original blue star as a backup. Change the fill color of star copy to lighter shade of blue, now with Selection Tool chosen (V) click Enter and insert 100 px for horizontal move and 0 px for vertical move, press Copy button – you’ll have the second star for our future united shape.

8. Again, just like with the blue stars, we’ll have to combine these two stars with help of additional shapes and pathfinder panel. Only this time we’ll need to join three pairs of points instead of two. Take a Pen Tool (P) and draw three shapes that cover gaps between star ends, be careful – the points must lie exactly on the stars endpoints (again, smart guides will help you). You can draw one single shape that unites all needed points – I made them grey for demonstration, but yours should be the same pink fill color. When you are ready, select all shapes and unite them in Pathfinder panel (Alt-click Add button).
9. Select the resulted shape and again, move it 100 px right with copy like we did before to get the second shape positioned properly. Now you can change the fill color of original left shape to lighter shade. Now, take the original blue star we backup before and bring it to front (Command + Shift + ]), now move it to the other blue shapes. Align it precisely with right and top points – smart guides will help as always. Or you can use Align panel of Illustrator.
10. Now, we have all elements for our composition. Unhide other shapes either clicking lock in Layers panel, or pressing Alt + Command + 2. Now we need to move the first set of 3 red + 1 white shapes to the center of document, and take the set of blue stars and position them so that the rightmost blue star lies exactly on the leftmost blue one. This way we form the main composition of stars. The last we need to do is delete black stroke in middle white star, and finally select the entire group of stars and move them to the top border of your cropping area – again, smart guides will indicate when top points touch top border. This step is needed for proper tiling of pattern fill that we are about to create.
11. I strongly recommend you to turn on grids (Command + ‘) and adjust it’s size to 40 px with 10 subdivisions in Preferences, so that the smallest grid is 4 x 4 px – the exact size we need. Now, turn Snap to grid option on (View > Snap to grid, or Command > Shift > “) – this will make our task much easier. It’s time to create our patterns – take a Rectangle Tool (M) and create a small rectangle exactly 32 px height and 20 px wide. In relation to grid, your rectangle will equal 5 x 8 divisions. Make this rectangle blue fill and no stroke. Now copy it and paste in front (Command + C and Command + F), change it’s fill to white, and reduce it’s height to 24 px – it’s easy with snap option, simply drag the top border 2 grids down.
12. We’ll make 6 patterns now – 3 blue and 3 red ones. Now alt-drag the rectangles we just made to the side, then reduce the height of top white rectangle to 16 px (minus 2 grids), now again repeat the duplication, and this time reduce top white rectangle height to 8 px (minus 2 more grids). You’ll get three pairs of rectangles – select them all and Alt-drag below to make a copy. Now change the blue rectangles of duplicated group and change their fill color to red. You can drag every pair of rectangles separately to Swatches panel now to save patterns.
13. Now, once we have our patterns ready, and star shapes positioned on top border of our cropping area, we can change the fills of shapes. From left to right, apply blue pattern to blue stars (from thinnest blue pattern on lighter left star, to widest blue pattern on darker red star ). White star will remain white, so move to applying red pattern fills to red stars the same way. When the patterns are applied, select all shapes and group them. Now, press Command + K, and in the general preferences window check “Transform pattern tiles”, so that when we move the stars, patterns move as well. Now just move the group to the center of canvas. Note: If you notice the thin line between pattern tiles when the pattern is applied as a fill, it doesn’t mean you created it incorrectly. It is because of Illustrator anti-aliasing function (you can switch it off in general preferences). Don’t worry, these lines won’t be visible while printing or saving as jpeg.
14. Finally, the stars are completed, we can lock this layer and rename it STARS. Now create new layer and draw a circle (L) 120 x 120 px, make it no fill and blue 10 pt stroke. Now rotate it by 45 degrees and cut it in every point with Scissors Tool (C). Now move this ring 140 px to the right with copy, and again to get 3 equal rings. Lastly, select two left rings of three and move them with copy 70 px horizontally and -70 px horizontally to get a set of 5 Olympic rings.
15. Now change the stroke of all rings except of leftmost to yellow, black, green, and red. Keep in mind that circles are not solid – we cut them in four parts each, so you’ll have to select every path separately. When colors are changed, here comes the tricky part – we’ll make overlapping rings. We’ve made it already in previous tutorials – just arrange the separate parts of rings forward or backward to create overlapping effect. When you have something like the image below – group the rings. Also, you can turn grid off now (Command + ‘).
16. The work is almost ready, we only need to add a text “Games of the XXIIIrd Olympiad Los Angeles 1984″. With Text Tool (T) type this phrase between the stars composition and Olympic rings. Choose black sans-serif italic font – I used 40 pt Myriad Pro Semibold Italic. The emblem is ready!
This is a modern logo with strong american spirit embodied in blue, white, and red colors and shape of stars. We recreated this emblem precisely with help of custom patterns, exact positioning, and pathfinder panel. Stay tuned for next tutorial
if you enjoy my tutorial & if its helpful to you than please comments about it, it will boost me to provide you best tutorials.